Start from a Phaser starter project with an HTML entry file, a JavaScript entry file creating the game instance, and a basic scene. Open it in your editor, launch a local web server, and confirm you see Phaser's preload, create, and update methods firing so your first playable scene is live.
What a Phaser project needs to run
A functioning Phaser project includes these main parts:
- index.html: The browser entry point that loads your game and script files.
- main.js: The main JavaScript file sets up the Phaser game instance and starts the first scene.
- Scenes: JavaScript files that define and control game stages through preload, create, and update methods.
- assets folder: Contains images, sprite sheets, and any static resources the game loads.

A code editor shows the Phaser project’s index.html file with several JavaScript tabs open across the top. — Scott Westover
Set up the project in your editor and local server
To get the game running in your browser, you need to serve it locally. One straightforward way with VS Code is to use the Live Server extension. The process:
steps
- Open the Phaser project folder in VS Code or your preferred editor.
- In VS Code, open the Extensions marketplace.
- Search for Live Server and install it.
- Once installed, click Go Live in the bottom toolbar, or open the command palette and run Live Server: Open with Live Server.
- Your default browser should open to the local game URL, displaying the game instance.

VS Code shows the Extensions marketplace with Live Server visible in the results list while a README is open on the right. — Scott Westover

Visual Studio Code shows the Live Server extension results alongside a README.md guide in the editor. — Scott Westover
Check that Phaser is actually running
Make sure the Phaser game is alive before working further:

A browser displays the running game instance beside open developer tools with console messages. — Scott Westover
Understand the scene setup and game loop
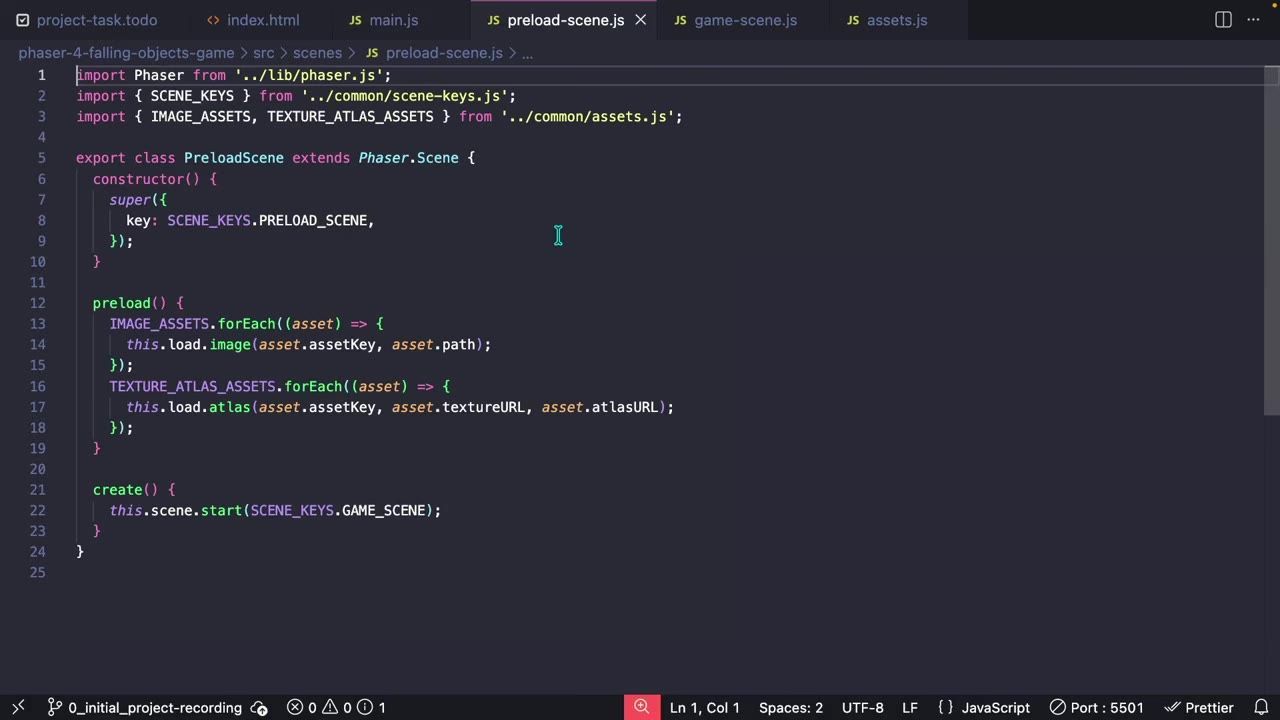
Phaser organizes your game into scenes, where most logic lives. Each scene follows a lifecycle:
- preload: Loads assets needed for the scene (images, sounds, data) before anything draws.
- create: Runs once after loading, used to build the scene and set initial properties.
- update: Fires continuously (often 60 times per second) to process input, move objects, and manage game logic.

The code editor is open to preload-scene.js with the scene methods visible. — Scott Westover
The core of Phaser is the game loop: input is processed, state is updated, and the screen re-renders repeatedly until the scene ends. Scenes help you organize this flow so each stage of your game can handle its setup, loading, and frame updates independently.
Add a first playable scene with preload, create, and update
To ensure your scene is functioning, add preload, create, and update methods to your scene class and log messages in each. This provides proof in the console that each lifecycle step is called:
before after
Original game scene file
class GameScene extends Phaser.Scene {
  constructor() {
    super({ key: 'GameScene' });
  }
  create() {
    // Game objects and logic here
  }
}With preload, create, and update logging
class GameScene extends Phaser.Scene {
  constructor() {
    super({ key: 'GameScene' });
  }
  preload() {
    console.log('preload called');
    // this.load.image('background', 'assets/background.png');
  }
  create() {
    console.log('create called');
    // this.add.image(400, 300, 'background');
  }
  update() {
    console.log('update called');
    // Handle keyboard input or movement here
  }
}
When you launch the server and open DevTools, you should see "preload called" and "create called" each once, and "update called" firing repeatedly. This means the game loop is alive.

The browser console shows preload, create, and update log messages beside the game canvas. — Scott Westover
Also worth knowing
- You may need a package.json file for npm setup: Without a package.json present in your starter project, running
npm installcommands will fail. Add the file if you need to manage local dependencies. - Import style can matter: Importing Phaser from a local library folder may cause errors if the import syntax does not match your project setup. Double-check import statements for compatibility.
FAQ
how to create a Phaser game project
Download a Phaser starter template, which includes essential files like index.html and main.js. Open the project in your code editor and ensure the structure matches the described minimum: an HTML entry, a game-starting JS file, at least one scene file, and an assets folder.
Phaser first scene tutorial
The first scene is a JavaScript class (or object) that defines preload, create, and update methods. Register it with your main.js, and let the game instance start this scene. The scene's methods handle loading, setup, and ongoing updates for your game.
Phaser install and setup guide
Serve the directory using Live Server in VS Code or a similar local web server, then open the project in your browser to verify the game loads.
Phaser add sprite and keyboard input
Inside the scene's create() method, use API methods to add sprites to the scene and configure keyboard input in update() or event handlers.
Phaser game loop basics
The game loop is split between the scene's update() method (which runs at about 60 frames per second), create() (runs once after assets load), and preload() (runs before loading content and is called once per scene activation).
build a browser game with Phaser
Combine all of the above: set up your project structure, write scene code for your main game logic, use the game instance to manage scene flow, add sprites and handle input, and run the project using a browser server. Each scene manages its part of the game through the Phaser loop.
Official reference: Phaser on GitHub.
Sources
Screenshots on this page are frames from the videos below, used to illustrate the steps they describe. All rights remain with their creators.
- Build Your First Game with Phaser 4 — Project Setup & Core Concepts — Scott Westover, April 13, 2026
Checked against:
- Phaser Speedrun and Customization Update — refractiongames2020, 2020-09-18