Start by creating a player scene using CharacterBody2D, organize your files for images, scenes, and scripts, and import your sprite sheet. Instancing the player scene in a main scene keeps playtest flexible. Set up animations with AnimatedSprite2D, define custom inputs, attach and adjust your player script, and use Project Settings to sharpen pixel art. Save your scenes, run the project, and handle movement, scale, and animation issues as they appear.
Project setup
prerequisites
- Godot Engine installed and running (2D mode preferred for this project).
- FileSystem panel is your workspace. Create dedicated folders: one each for images, scenes, and scripts.
- Import your player sprite sheet by dragging it into the images/player folder so Godot brings it into the project.
- Assets are locally available before creating nodes and scenes.
Scene system
Begin by creating the player as a reusable scene, then set up the main game scene where everything is assembled.
- Create the player scene:
- In the node panel, search for CharacterBody2D and add it as the root node.
- Rename this node to player for clarity.
- Save this scene to your scenes folder.

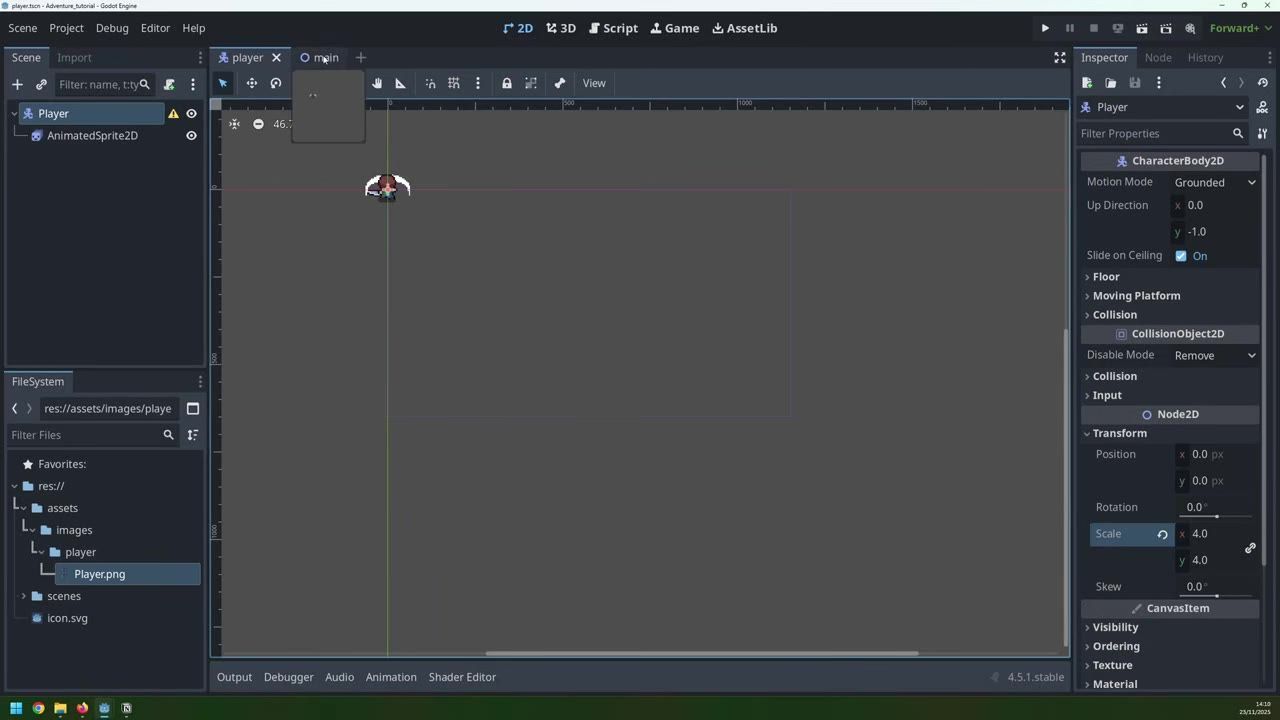
The Godot editor shows a scene tree with Player selected and CharacterBody2D properties in the Inspector. — Coding With Russ
Set up the main scene:
- Create a new 2D scene (the simplest 2D node available).
- Rename this root node to main.
- Save this as your main game scene inside the scenes folder.
Instance the player into the main scene:
- With your main scene open, use Instantiate Child Scene and select your player scene. This allows you to position the player and later add enemies or terrain.
- Move the player node to your desired location in the main scene, not in the player scene itself.
Nodes and sprite frames
Set up sprite animation using AnimatedSprite2D and organize your animations:
- Add AnimatedSprite2D as a child of the player node.
- In the Inspector, create new SpriteFrames and open the animation panel at the bottom of the editor.
- Use Add Frames from Sprite Sheet to import and split your sprite sheet:
- Adjust the columns and rows until every frame is in its own box. For example, you may need to set columns to 6 and rows to 10 if that's what your asset uses.
- Drag to select the frames for each animation (such as idle_right, idle_up).
- Rename each animation clearly, like idle_right, idle_up, so your script can reference them.
- Enable looping for repeating animations such as idle.
- Adjust the frame rate in the animation panel to make the animation feel natural (for example, running faster than idle).

The Godot Inspector shows an AnimatedSprite2D with SpriteFrames selected while the animation frames panel is open below. — Coding With Russ
Editor workflow

The Project Settings window is open on Rendering > Textures, with the Default Texture Filter setting visible as Linear. — Coding With Russ
Script basics
Attach your first script to the player node, clean up platformer code, and set up movement and animation functions:
- Attach a GDScript file to the player node and save it in your scripts folder for project organization.
- The generated script includes platformer logic: gravity and jumping. Remove those sections for a top-down (non-jumping) game.
- Define your custom input actions in the project settings’ Input Map for left, right, up, down, attack, and map both arrow keys and WASD as needed. Don’t use the out-of-the-box UI left/right actions for gameplay.
- Refactor the movement code:
- Add your own
process_movementfunction and call it from_physics_process. - Use
get_vectorto read input for all four directions. - Multiply the direction by speed and assign it to the velocity.
- Add your own
- Split animation handling:
- Add a
play_animationfunction that selects the correct animation based on direction and state. - Add a
process_animationfunction to pick between idle, run, or attack based on movement.
- Add a
Here’s a basic template drawn from the process:
# scripts/player.gd
extends CharacterBody2D

const SPEED = 200.0

var last_direction = Vector2.RIGHT

@onready var animated_sprite_2d = $AnimatedSprite2D

func _physics_process(_delta):
    process_movement()
    process_animation()

# Handles movement and updates last_direction
func process_movement():
    var direction = Input.get_vector("left", "right", "up", "down")
    if direction != Vector2.ZERO:
        velocity = direction * SPEED
        last_direction = direction
    else:
        velocity = Vector2.ZERO
    move_and_slide()

# Decides which animation to play
func process_animation():
    if velocity != Vector2.ZERO:
        play_animation("run", last_direction)
    else:
        play_animation("idle", last_direction)

# Select and play the animation; flips left/right as needed
func play_animation(prefix, direction):
    if direction.x != 0:
        animated_sprite_2d.animation = "%s_right" % prefix
        animated_sprite_2d.flip_h = direction.x < 0
    elif direction.y < 0:
        animated_sprite_2d.animation = "%s_up" % prefix
        animated_sprite_2d.flip_h = false
    elif direction.y > 0:
        animated_sprite_2d.animation = "%s_down" % prefix
        animated_sprite_2d.flip_h = false
animated_sprite_2d.play()- When you see a yellow warning about an unused
deltaparameter, rename it to_deltain your_physics_processto clear the warning.
Playtest and fix movement
Test your playable scene and fix common movement/animation problems as they come up.

Godot Engine displays a running game window with the player visible in the main scene. — Coding With Russ
before after
Before
Player movement switches to the default idle animation without regard to the last movement direction. When the player stops moving, the facing direction resets and idle animation always shows a default facing.
After
A last_direction variable stores the most recent movement direction. When stationary, the idle animation is played in the direction the player was last moving. Animation state and facing now match expected behavior.
To test:
- Run the project from the main scene. The player should appear in the window at the correct scale and position.
- Move the player with arrow keys or WASD. The run animations update in each direction, including diagonals.
- When the player stops, the idle animation matches the last direction moved.
- If you see any warnings about unused parameters in scripts, prefix the variable with an underscore and re-save.
Also worth knowing
- Project-wide texture filter: Set the texture filter to nearest in Project Settings once, so all pixel art appears crisp and you do not have to adjust each sprite.
- Custom input actions: Define input actions like left, right, up, down, and attack in the Input Map for predictable gameplay behavior, instead of using default UI actions.
- Persistent facing: Use a last direction variable, so when movement stops the player keeps facing the correct way in idle.
- Strip platformer code: CharacterBody2D scripts come with gravity and jump handling; remove these for a top-down game to prevent unwanted behaviors.
- Unused parameter warning: If you see a warning about an unused parameter like delta, prefix it with an underscore (e.g.,
_delta) to silence the warning.
FAQ
how to start a Godot project
Start by making a player scene using CharacterBody2D, import your art and assets into organized folders, and save your player scene before building a main scene that instances it.
Godot first 2D game tutorial
Create a player using CharacterBody2D and AnimatedSprite2D, set up input actions, attach a movement script, and build a main scene that instantiates your player node for testing.
Godot scene and node basics
Every game object is a node. Bundle nodes together into scenes to create reusable entities like a player or an enemy, and combine them in a main scene to assemble your level.
Godot beginner setup guide
Organize by creating folders for images, scenes, and scripts. Import your assets, set up your game structure with scenes for player and main, and adjust Project Settings for your art and input actions.
how to make a playable scene in Godot
Save your scenes, instantiate the player in your main scene, configure input in the Input Map, and run the project from the main scene with scripts attached for movement and animation.
Godot install and first run
After installing Godot, launch the editor, switch to the 2D workspace, create your first scene, and test it in the game window. Use the run buttons to preview both individual scenes and the whole project.
Official reference: Godot documentation.
Sources
Screenshots on this page are frames from the videos below, used to illustrate the steps they describe. All rights remain with their creators.
- Godot Top-Down Action Game Tutorial - Part 1: Player Movement & Animations — Coding With Russ, December 13, 2025
Checked against:
- Godot Engine - Blog – Godot Engine — Godot Engine