Start in Unity Hub by choosing a new Universal 3D project, then build your scene with a ground, player, coin, and connect everything with scripts. Use the Inspector to assign prefab and reference fields, play test, and adjust the coin collider and input settings if collection or movement does not work.
First project setup
steps
- Open Unity Hub on your computer.
- Click New Project.
- In the template selection view, choose Universal 3D from the list of available templates.
- Name your project (for example, "tutorial").
- Disable Unity Version Control before creating it.
- Click Create project to generate your project and launch the Unity editor.

Unity Hub is open on the New project screen with templates listed and the Create project controls visible. — JD Dev
Editor basics
prerequisites
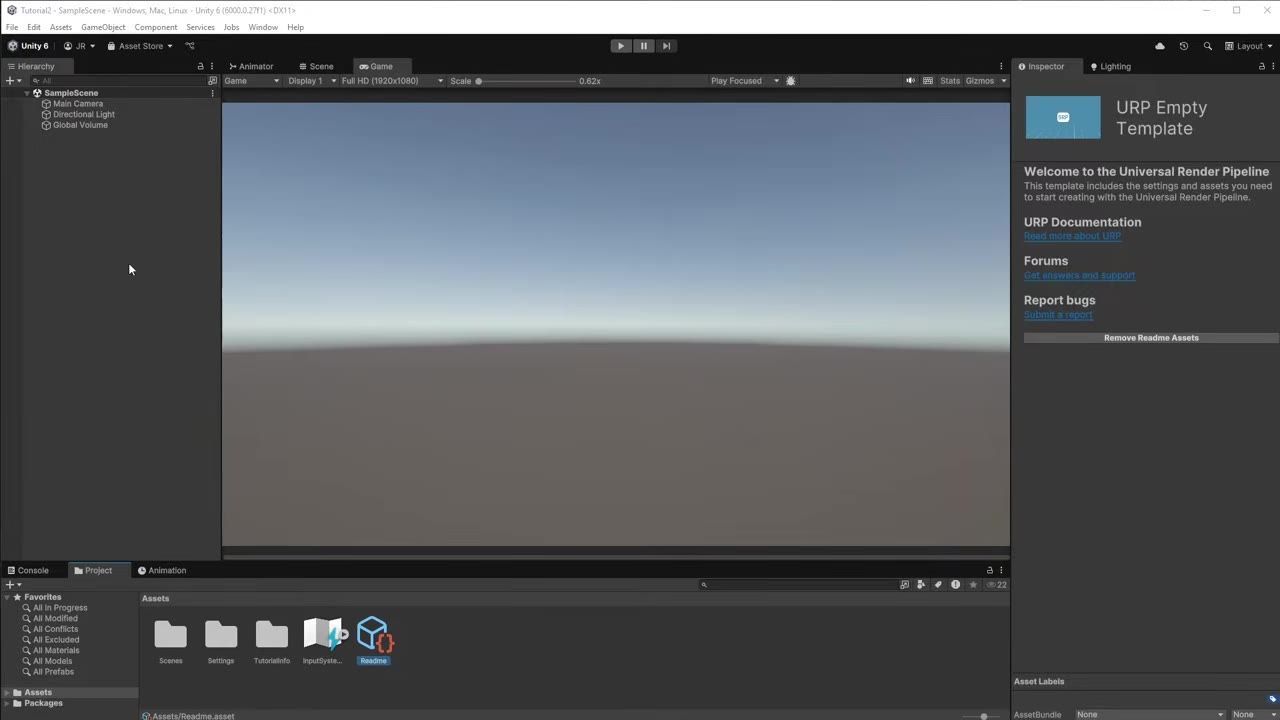
- Hierarchy: Displays all game objects in your current scene. Use this to select, rename, or organize them.
- Scene tab: Main workspace that lets you place, move, and edit objects.
- Game tab: Shows what the camera sees and how the game plays.
- Inspector: Shows and lets you modify the settings of the currently selected object.
- Project window: Holds your assets such as models, textures, scripts, and prefabs.

Unity editor shows the Hierarchy, Scene and Game tabs, Inspector, and Project window in the standard layout. — JD Dev
Scene setup
steps
- Create the ground: In the Hierarchy, right-click, choose 3D Object > Cube, and rename it to ground.
- Set ground transform: In the Inspector, set Position to (0, 0, 0). Set Scale to X: 20, Y:1, Z:20 for a wide platform.
- Create the player: In the Hierarchy, right-click, choose 3D Object > Cube, and rename it to player. Set position to X:0, Y:1, Z:0 to sit above the ground.
- Create the coin: In the Hierarchy, right-click, choose 3D Object > Cube, and rename it to coin. Move it off the player and set its Scale to 0.5 on each axis to make it smaller.
- Assign materials (optional): Create a Materials folder in the Project window, make new materials, and drag them onto objects for distinct colors.

Unity shows a cube in the center view with the Hierarchy on the left and the Inspector open on the right. — JD Dev
Prefab basics
file tree
Assets/
├── Materials/
│   ├── Ground.mat
│   ├── Player.mat
│   └── Coin.mat
├── Prefabs/
│ └── Coin.prefab- Drag the coin object from the Hierarchy into the Prefabs folder in the Project window to create a coin prefab.
- Delete the coin object from the scene after making the prefab to keep it managed through the prefab asset.
- In the Hierarchy, create an empty object and name it Coin Spawner to hold your coin spawning script and references.

The Unity editor shows the Hierarchy and the Project window open to a Prefabs folder with a Coin prefab visible. — JD Dev
Workflow
steps
- Add Coin Spawner script: With Coin Spawner selected, click Add Component, choose New Script, and name it "CoinSpawner".
- Paste the spawning code: Use this script to instantiate coins at random ground positions:
using UnityEngine; public class CoinSpawner : MonoBehaviour { [SerializeField] private GameObject coinPrefab; [SerializeField] private BoxCollider groundCollider; [SerializeField] private int coinAmount = 20; void Start() { for (int i = 0; i < coinAmount; i++) { Vector3 pos = GetRandomPointInBounds(groundCollider.bounds); Instantiate(coinPrefab, pos, Quaternion.identity); } } Vector3 GetRandomPointInBounds(Bounds bounds) { float x = Random.Range(bounds.min.x, bounds.max.x); float z = Random.Range(bounds.min.z, bounds.max.z); return new Vector3(x, 1, z); // Y set to 1 to sit above ground } } - Connect assets in Inspector: Drag the ground (its Box Collider) and the Coin prefab from the Project window onto their fields in the Coin Spawner.
- Add Player handler script: On the player object, Add Component > New Script, name it "PlayerHandler". Also add Rigidbody for physics.
- Player movement code:
using UnityEngine; public class PlayerHandler : MonoBehaviour { private Rigidbody rb; [SerializeField] private float playerSpeed = 10f; private int points = 0; void Awake() { rb = GetComponent<Rigidbody>(); } void FixedUpdate() { float h = Input.GetAxis("Horizontal"); float v = Input.GetAxis("Vertical"); Vector3 move = new Vector3(h, 0, v); rb.MovePosition(rb.position + move * playerSpeed * Time.fixedDeltaTime); } public void IncreasePoints() { points++; } } - Add Camera follow script: On a camera object (Create Empty, add Camera if needed), add this script:
using UnityEngine; public class FollowPlayer : MonoBehaviour { [SerializeField] private Transform target; [SerializeField] private Vector3 offset = new Vector3(0, 10, -10); [SerializeField] private float smoothTime = 0.25f; private Vector3 velocity = Vector3.zero; void FixedUpdate() { Vector3 desiredPosition = target.position + offset; transform.position = Vector3.SmoothDamp(transform.position, desiredPosition, ref velocity, smoothTime); transform.LookAt(target.position); } } - Assign camera target: In the Inspector, set the camera script's target to the player, set offset Y:10 Z:-10, and smooth time 0.25.

The Player object is selected in Unity while the Add Component menu is open and a new script option is available in the Inspector. — JD Dev
Play mode and fixes

The Coin prefab is open in the Inspector and the Box Collider’s Is Trigger checkbox is visible. — JD Dev
Also worth knowing
- Input System setup: If your movement does not work, set Active Input Handling in Project Settings to Both so the old Input APIs take effect.
- Script attachment: When adding a script using Add Component, Unity may prompt you to save the .cs file to finish script creation.
- Camera target references: The follow camera script needs the target variable to point to the correct player; double-check references if the camera does not follow.
- Inspector debug mode: If a script field is not visible in the Inspector, switch to debug to see private fields and check their values.
- Window layout recovery: If panels like the Hierarchy are closed by accident, reopen them from the Window menu, but the layout may differ from the default.
FAQ
Unity 6 complete beginners tutorial
Unity 6 beginners should start by creating a new project using Unity Hub, building a simple scene with a ground, player, and coins, and adding scripts for basic movement and collection as outlined above.
how to start a Unity project
Open Unity Hub, click New Project, select the Universal 3D template, name your project, turn off version control unless you need it, and click Create project.
Unity editor basics for beginners
The Hierarchy lists your objects, the Scene tab is the workspace to arrange them, the Game tab shows what the camera sees, the Inspector edits object settings, and the Project window holds assets like models and scripts.
Unity project setup guide
First, make sure you have Unity Hub and the Unity editor installed. Use Unity Hub to create a new project, then add and arrange objects in the scene, make prefabs, and link scripts and assets through the Inspector.
Unity beginner workflow tutorial
Layout your scene with a ground, player, and collectibles, create and organize assets in folders, add and connect scripts for behavior, use the Inspector to wire up references, and test in Play mode, fixing collider and input issues as they appear.
Official reference: Unity manual.
Sources
Screenshots on this page are frames from the videos below, used to illustrate the steps they describe. All rights remain with their creators.
- Unity 6 - Complete Beginners Tutorial (2025) — JD Dev, January 9, 2025
Checked against:
- Download Archive — Unity