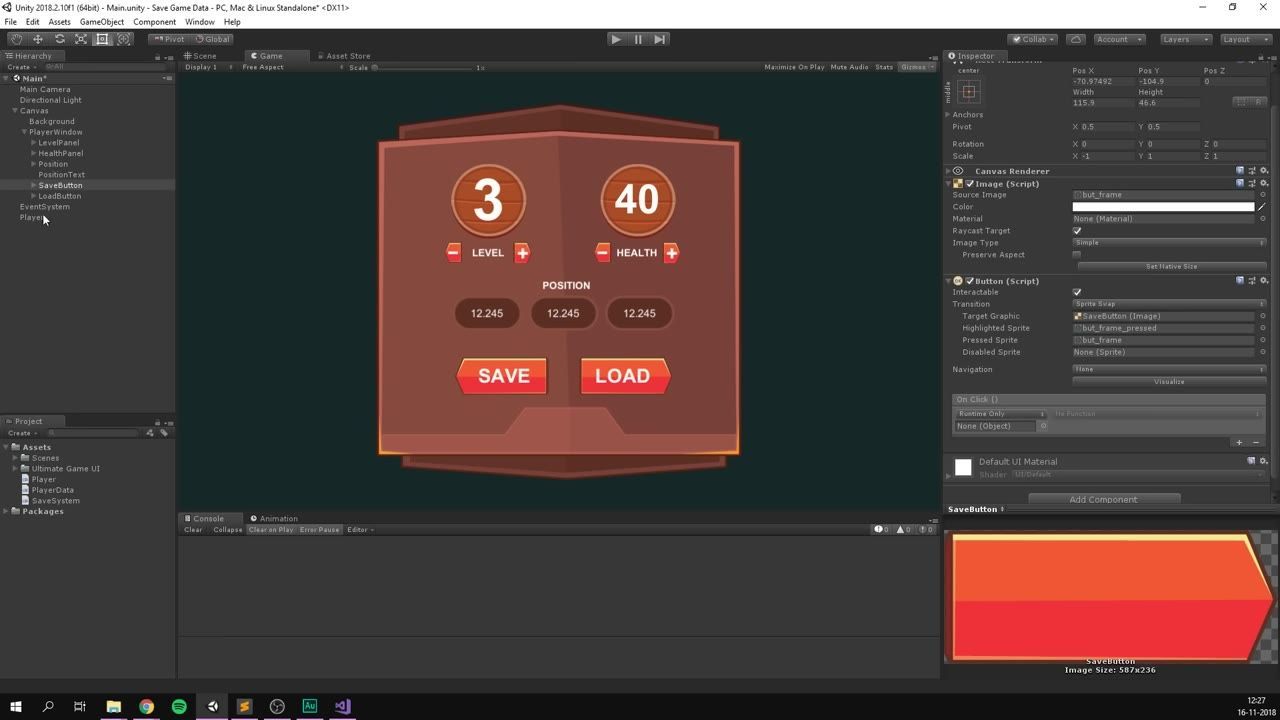
Set up UI buttons on a Canvas, connect them to save and load functions on your player script, and store the data in a file under Application.persistentDataPath. Then test the buttons in Play Mode and verify the saved values still load after restarting the game.
How the save flow works
Saving game data in Unity follows a straightforward pattern. Collect the values you want to store from your player—such as position, level, and health—convert any Unity-specific types (like Vector3) into basic data types, and write them to a file using a custom serializable class. When needed, read this file back, rebuild the player data, and apply it to your player. For very small data like settings or high scores, PlayerPrefs is fine, but for storing actual game progress, use a custom binary file with Application.persistentDataPath to persist data safely between play sessions.
Build the player data class
The first step is to create a separate class that mirrors the player data to be saved. This script is not a component—it only holds data. Level and health are stored as integers, and position as a plain array of floats, not as a Vector3, because Unity-specific types will not serialize.

Visual Studio shows the new PlayerData.cs script alongside the project tree in Solution Explorer. — Brackeys
steps
- In your project's Assets folder, create a new C# script and name it
PlayerData. - Remove any methods and the inheritance from MonoBehaviour, leaving only the class itself.
- Add the
[System.Serializable]attribute above the class declaration. - Add the following code to define your data structure:
using System;

[Serializable]
public class PlayerData
{
    public int level;
    public int health;
    public float[] position;

    public PlayerData(Player player)
    {
        level = player.level;
        health = player.health;
        position = new float[3];
        position[0] = player.transform.position.x;
        position[1] = player.transform.position.y;
        position[2] = player.transform.position.z;
    }
}
Create the save system script
Now add a static script to handle writing and reading files, using System.IO and a binary formatter. The save path uses Application.persistentDataPath, ensuring it works everywhere Unity runs. Save and load functions open the file, perform the operation, and close the stream.

The Unity Project window shows the PlayerData script selected while its code is displayed in the Inspector. — Brackeys
steps
- Create a new C# script named
SaveSystem. Remove MonoBehaviour and any default methods, and make the classstatic. - At the top, add the necessary using statements for file operations and serialization.
- Add the following code for saving and loading:
using System.IO;
using System.Runtime.Serialization.Formatters.Binary;
using UnityEngine;

public static class SaveSystem
{
    public static void SavePlayer(Player player)
    {
        BinaryFormatter formatter = new BinaryFormatter();
        string path = Application.persistentDataPath + "/player.fun";
        FileStream stream = new FileStream(path, FileMode.Create);

        PlayerData data = new PlayerData(player);
        formatter.Serialize(stream, data);
        stream.Close();
    }

    public static PlayerData LoadPlayer()
    {
        string path = Application.persistentDataPath + "/player.fun";
        if (File.Exists(path))
        {
            BinaryFormatter formatter = new BinaryFormatter();
            FileStream stream = new FileStream(path, FileMode.Open);

            PlayerData data = formatter.Deserialize(stream) as PlayerData;
            stream.Close();
            return data;
        }
        else
        {
            Debug.LogError("Save file not found in " + path);
            return null;
        }
    }
}
Wire save and load into the player script
Next, expose public methods in your player script for the Save and Load buttons to call. The save method calls the static save function, and the load method restores the player state from file.
steps
- In your player script, write two public methods called
SavePlayer()andLoadPlayer(). - In
SavePlayer(), callSaveSystem.SavePlayer(this). - In
LoadPlayer(), callSaveSystem.LoadPlayer()and apply the loaded data to your player fields. Reconstruct the position from the saved float array before settingtransform.position.
public void SavePlayer()
{
    SaveSystem.SavePlayer(this);
}

public void LoadPlayer()
{
    PlayerData data = SaveSystem.LoadPlayer();
    if (data != null)
    {
        level = data.level;
        health = data.health;
        Vector3 position;
        position.x = data.position[0];
        position.y = data.position[1];
        position.z = data.position[2];
        transform.position = position;
    }
}
Connect buttons in the Unity UI
Attach your Save and Load methods to UI buttons so that they can be triggered in-game. Set up On Click events in the Button component and link to the player object.

The Unity Editor shows the SaveButton selected and the Button component On Click section in the Inspector. — Brackeys
steps
- Add two UI Buttons to your Canvas—label them Save and Load.
- Select the Save button and add an On Click event in the Button Inspector.
- Drag your player object (the one with the script attached) into the event field.
- From the dropdown, select the player's public
SavePlayer()function. - Repeat for the Load button, linking it to the player's
LoadPlayer()function.
Test the save and load loop
To confirm everything works, change your player values in Play Mode, save, change the values again, then load and check that the values revert to what was saved. Restart Play Mode to verify the data persists between sessions.

The Game view displays a save and load panel with level, health, and position values above Save and Load buttons. — Brackeys
before after
Without pressing Load
- Adjust player’s level, health, or move the player. Press Save, change the values again. The displayed values remain at their new state.
After pressing Load
- The values snap back immediately to the last saved state. Restart Play Mode and Load: values still match what was saved previously.
When to use a simpler or larger solution
Choose this save system for small and simple games
This custom save system is fast to implement and is perfect for projects that only need to store a handful of player stats. As more systems or data types require saving and loading, this approach becomes repetitive and can be hard to maintain. If your project grows or you need to store more advanced Unity types, consider using a dedicated asset for saving data to handle complexity and scale more efficiently.
Also worth knowing
- Automatic file closing: Use a
usingstatement for file streams to ensure files close properly, even if an error occurs. - Cross-platform paths: When making file paths, use
Path.Combineso that your code works across different operating systems. - Serializing data: Unity types like Vector3 need to be converted to simple data types (like float arrays) before serialization.
- Handling collections: If saving multiple values, a List structure may be easier to work with than an array when splitting and repacking saved data.
- User save choices: You can let players name their save files or select files to load for a more customizable system.
- Scaling with project size: This kind of direct save/load code is ideal for small projects. As things get more complex, a dedicated save system asset can make your workflow easier.
FAQ
how to build UI in Unity
Add a Canvas to your scene, then place UI elements such as Buttons or Text under it. Assign actions to Button components in the Inspector using the On Click event list, linking each button to a method on a script attached to a GameObject.
Unity save and load tutorial
Create a data class marked as serializable, write static save and load methods that use a BinaryFormatter to serialize and deserialize your objects, and store the file under Application.persistentDataPath. Map the loaded data back onto your player or relevant objects.
Unity main menu tutorial
Set up a separate Canvas for your main menu with Buttons for actions such as Start, Load, and Settings. Assign button events to the appropriate methods, such as loading a scene or triggering load functionality.
Unity build and export guide
Export your game using the Build function found in Unity’s File menu. Choose the appropriate platform and configuration, and Unity will create a standalone build at your selected destination.
Unity settings menu and buttons
Build a Canvas for your settings menu with interactive UI components like Sliders (for volume or sensitivity) and Toggles (for checkboxes). Link each control to public methods or variables in your settings management scripts.
Unity persistent data basics
Store files under Application.persistentDataPath, which always points to a writeable and consistent location on any supported platform. Use simple data formats and proper serialization to keep your data organized and accessible between play sessions.
Official reference: Unity manual.
Sources
Screenshots on this page are frames from the videos below, used to illustrate the steps they describe. All rights remain with their creators.
- SAVE & LOAD SYSTEM in Unity — Brackeys, December 2, 2018
Checked against:
- Download Archive — Unity