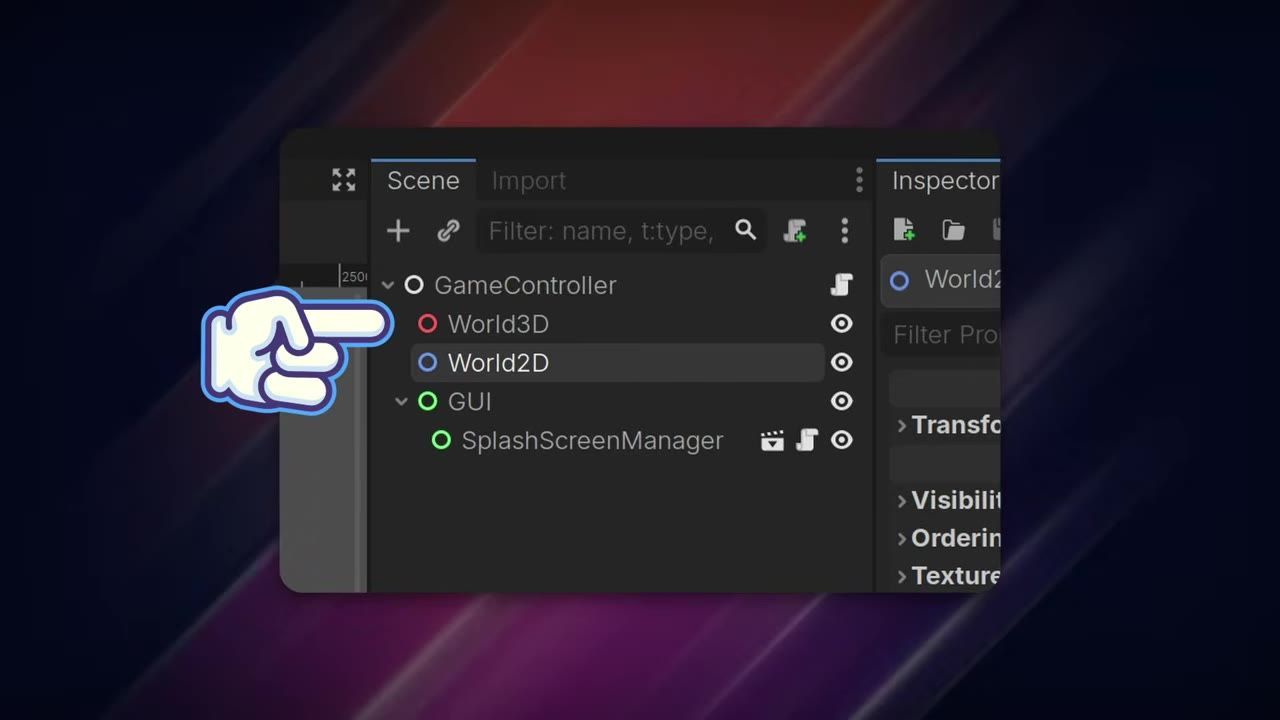
To manage UI, save data, and scene changes in Godot, create a root controller scene with separate 3D, 2D, and GUI containers, register it as an autoload, and write functions to swap in new scenes as needed. This keeps menus, gameplay, and overlays organized and makes it possible to manage persistent game state without clearing the whole scene tree.
What this scene controller does
This setup uses a single main scene as the persistent root of your project, containing three main child containers: one for 3D content, one for 2D content, and one for GUI elements. By loading, hiding, or removing scenes through the controller instead of deleting the entire scene tree, UI overlays and other stateful nodes remain in place across scene changes. You can switch individual layers (like the menu, game world, or overlays) independently, making save/load and transitions easier to reason about.
Create the game controller scene
steps
- Create a new scene and set a basic Node as the root. Name this root GameController.
- Attach a new script to the root node.
- Add three child nodes: a 3D node (name it
World3D), a 2D node (name itWorld2D), and a Control node (name itGUI). These will act as scene containers for 3D, 2D, and UI layers.

The Godot editor shows a GameController scene tree with World3D, World2D, and GUI child nodes. — StayAtHomeDev
Register the controller as an autoload
prerequisites
- Open Project Settings and find the Autoload tab.
- Add the script you just attached to your
GameControlleras a global singleton (autoload). - In a global script, store a reference variable for the game controller so it can be accessed project-wide.

The Project Settings Autoload tab shows a global script added to the autoload list. — StayAtHomeDev
Store scene references for UI and gameplay
steps
- In your
GameControllerscript, add exported variables for the 3D, 2D, and GUI scene types. This lets you assign scenes from the Inspector. - Set the export variables in the Inspector to your chosen initial scenes (such as a splash screen manager or main menu scene).
- Add variables to store the currently loaded scene for each of the three containers.

A code editor shows exported scene references for 3D, 2D, and GUI control scenes. — StayAtHomeDev
Write the screen change functions
When it is time to change which scene is in the GUI, 2D, or 3D layer, use specialized functions in your controller. These take care of hiding, deleting, or just removing (detaching) the previous scene as needed before adding the new one.
before after
Old method (direct tree change):
get_tree().change_scene_to_packed(main_menu_scene)With controller functions:
func change_gui_scene(scene_path: String, delete: bool, keep_running: bool):
    if current_gui_scene != null:
        if delete:
            current_gui_scene.free()
        elif keep_running:
            current_gui_scene.visible = false
        else:
            remove_child(current_gui_scene)
    var new_scene_resource = load(scene_path)
    var new_scene = new_scene_resource.instantiate()
    $GUI.add_child(new_scene)
    current_gui_scene = new_scene

# Repeat a similar function for change_2d_scene and change_3d_scene,
# adjusting container references as needed.
A code editor displays the change_gui_scene function with delete and keep_running parameters. — StayAtHomeDev
Hook up the splash screen and main menu
steps
- In your splash screen manager or similar entry scene, look for where you switch to the next packed scene.
- Replace that code with a call to your controller's change function, passing the path to your main menu scene.

A script in the GameController window changes the scene when input is pressed. — StayAtHomeDev
Also worth knowing
- Reusing vs. recreating scenes: If you remove or hide scenes but still instantiate a new one every time, you will create new objects with fresh data, not reuse the old instance.
- Controller assignment: The controller reference should be set in
_initor checked before assignment to avoid overwriting an existing node. - Mouse event passthrough: The GUI container can block mouse clicks on Area2D nodes. Set its Mouse Filter to Ignore if you do not want this.
- Restoring scenes: If you remove a scene from a container and want to show it again later, you need to keep its reference somewhere. Otherwise, the manager has no access to the old instance.
- Cross-scene references: Exported references between objects in different scenes are cumbersome with this model; wire shared links through code or another global manager instead.
- Remove targets: When removing scenes in the 2D or 3D switch functions, be sure you are affecting the correct container node.
FAQ
how to build a menu in Godot
Use a Control node as the root of your menu. Add Buttons and other UI elements as children. Then load the menu scene into the GUI container using your game controller's change function.
Godot save and load tutorial
Keep your save data in a global manager or autoload singleton so it can persist between scene changes. Save relevant data from loaded scenes before unloading them, and load data after re-instantiating scenes as needed.
Godot pause menu guide
A pause menu can be its own scene of Control nodes, loaded into the GUI container and shown or hidden as needed. You can pause the game and manage the visibility of the pause menu from your controller.
Godot scene transition tutorial
Use the change functions in your game controller to remove, hide, or free the current scene in a container and add a new scene. This enables smooth screen transitions without clearing the whole tree.
Godot settings menu with buttons
Create a settings menu as a separate Control scene with the necessary buttons. Load this menu into the GUI container when needed. Use buttons to change settings or call functions in your scripts.
Godot persistent game state
Store persistent game state in a singleton (autoloaded script or object), not in any specific gameplay or menu scene. This ensures your state survives as scenes load and unload independently in each container.
Official reference: Godot documentation.
Sources
Screenshots on this page are frames from the videos below, used to illustrate the steps they describe. All rights remain with their creators.
- The SMART Way to Manage Scenes in Godot — StayAtHomeDev, October 10, 2024
Checked against:
- Godot Engine - Blog – Godot Engine — Godot Engine