To export a Godot 4 game to Windows, install the export templates, add a Windows desktop export preset, configure the build and packaging settings (such as embedded PCK), and export the project to a chosen folder. Check your exported executable runs correctly outside the editor before shipping.
Install the export templates first
Before you can export your game, you need to install the export templates.

The Godot editor shows the Project menu open with Manage Export Templates available. — Muddy Wolf
- Open the editor menu and choose Manage Export Templates.
- In the Export Template Manager dialog, pick a download source. Selecting GitHub was found to be fast.
- Click Download and Install to install the templates.

The Export Template Manager dialog is open with the Download and Install button visible. — Muddy Wolf
- When the installation finishes, confirm the template version and installation location are correct.
- If the manager reports issues, use the uninstall and reinstall options in the same window.
Create a Windows desktop export preset
Set up the Windows export preset to prepare to build your game for Windows.

The Export dialog shows the Windows Desktop preset selected among the available export presets. — Muddy Wolf
- Open the project export settings window.
- Add a new preset, choosing Windows desktop as the export target.
- Do not select the Universal Windows option unless you are targeting a marketplace that needs it.
- Name your preset if you might need to distinguish release or debug builds.
Set the packaging and build settings
Adjust options to set how your game appears and functions on Windows.

The export preset window is open with build settings like Export Console Wrapper and Embed PCK visible. — Muddy Wolf
- Set Export console wrapper to No if you do not want your game to open a console window.
- Turn on Embed PCK file to combine all game data into a single executable, making it easier to distribute.
- Fill in the file version, product version, company name, and game name to set the appropriate metadata.
- Use the optional metadata fields (e.g., description, copyright, trademarks) as you need.
- Note the reminder about game icons: to change the Windows icon, you will need to set up the RC editor path in the editor settings as described in the warning.
Export the project to a build folder
Now generate your Windows build.

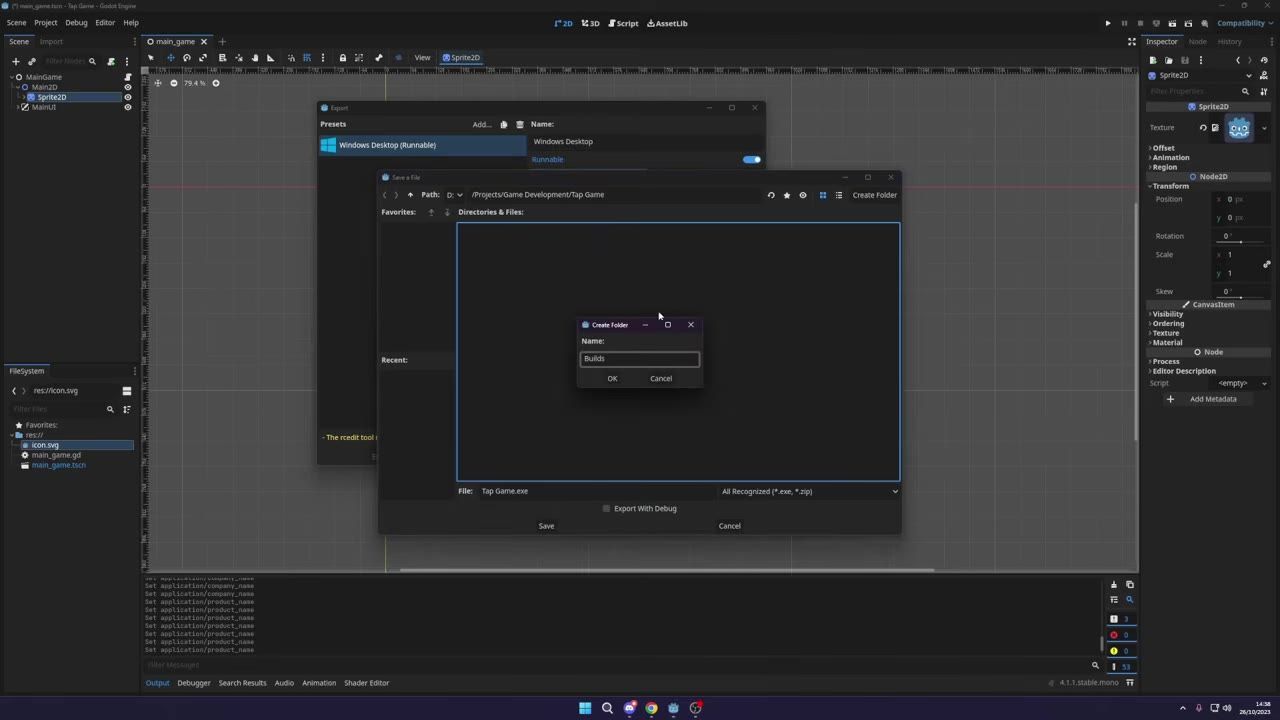
The Export dialog is open with a Windows Desktop preset and a save file picker for the build location. — Muddy Wolf
- With your Windows export preset selected, click Export Project.
- Select or create a build folder as your export destination.
- Enter a name for the exported executable and click Save to start the export.
- Wait for the export process to finish and check the output folder for the new
.exefile.
Run the Windows build and ship it

A Windows file browser is open over the Godot editor, showing the project folder and build-related files. — Muddy Wolf
Open the exported executable from the build folder to confirm your game launches outside of the Godot editor.
Also worth knowing
- Custom icon setup: Changing the Windows icon requires configuring the icon tool and RC editor path in the editor settings.
FAQ
how to export a Godot 4 game to Windows
Install the export templates using the export templates manager, add a Windows desktop export preset, and export your project to a folder. Use embedded PCK for a single executable if needed.
Godot 4 Windows build tutorial
Open the export templates manager in Godot, download and install templates, set up a Windows desktop export preset with your game details, then export and test your build.
Godot export preset setup
Open project export settings, create a Windows desktop preset, and fill in version, company, and game name fields. Adjust build and packaging options to suit your needs before exporting.
Godot packaging tutorial for beginners
Enable embedded PCK for a cleaner package with fewer files to distribute. Set your metadata and icon path if desired, then export the game to a build folder.
how to ship a Godot game on Windows
Export the executable, test it outside the Godot editor to confirm it runs, and distribute the exported folder or executable using your preferred delivery method.
Sources
- Godot Engine - Blog – Godot Engine
Official reference: Godot documentation.
Sources
Screenshots on this page are frames from the videos below, used to illustrate the steps they describe. All rights remain with their creators.
- Export Your Game to Windows with Godot 4 - Tutorial — Muddy Wolf, October 26, 2023
Checked against:
- Godot Engine - Blog – Godot Engine — Godot Engine