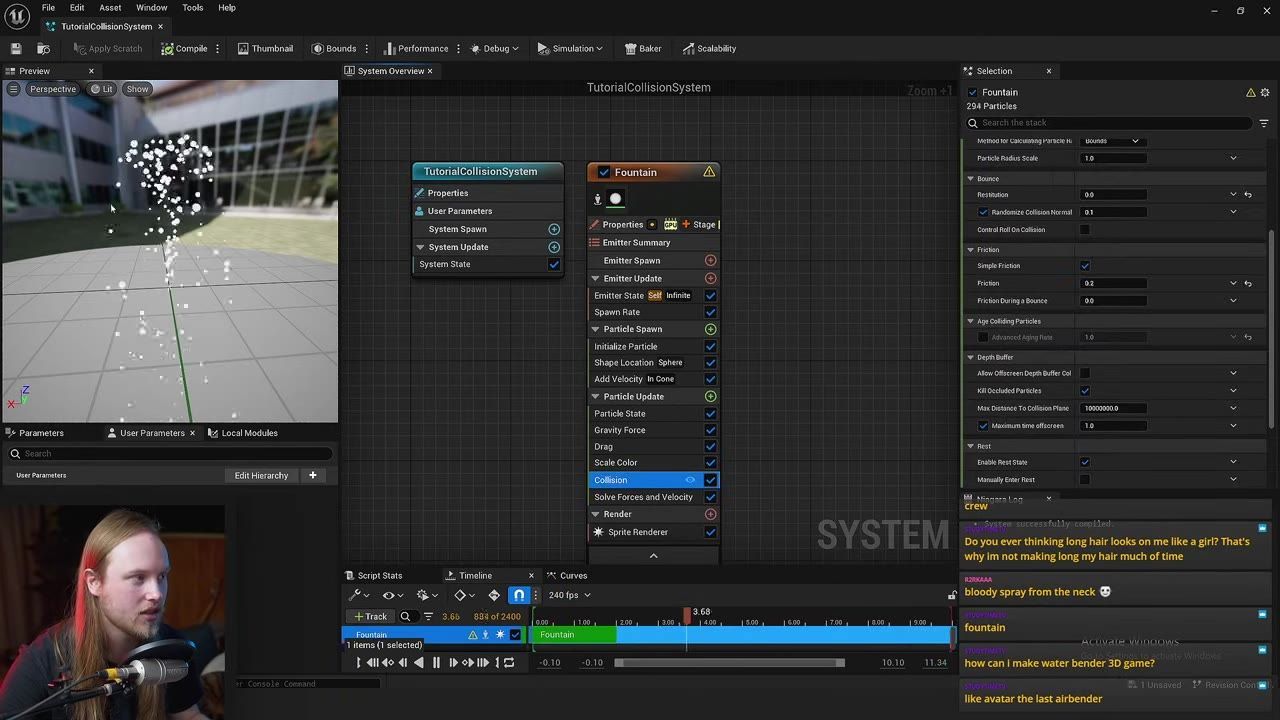
In Unreal Engine 5's Niagara, add collision to particle effects by inserting the Collision module into the Particle Update stack of your emitter. Adjust CPU collision for per-particle accuracy using channel and bounce controls, or use GPU collision for larger effects, choosing between depth buffer and distance field methods based on your scene and visual needs.
Set up a Niagara system for collision testing
Before adjusting collision modes, create a simple Niagara particle system so that changes are clear and easy to observe.
prerequisites
- Open Unreal Engine 5.
- Create a new empty Niagara system and open it.
- Add an emitter using a template, such as Fountain.
- Place the Niagara system into your level.
- Confirm that particles currently fall through the scene with no collision.
- Set the particle Lifetime to a longer value (for example, 5 seconds) so particles stay visible for testing.

The Unreal Engine editor shows the Niagara system creation dialog with Create empty system selected over the Content Browser. — PrismaticaDev
Add the Collision module in Particle Update
Insert the Collision module where the emitter checks each particle every frame. This makes sure collision is continuous and matches the world.
steps
- In your Niagara emitter, find the Particle Update section in the stack.
- Add a new module and select Collision.
- The Collision module belongs in Particle Update because it needs to run every update to detect real-time interactions with the world.
- After enabling, test the system—particles should stop passing through the landscape and respond to the surface.

The Niagara emitter stack is open with the add new module menu over Particle Update. — PrismaticaDev
Tune CPU collision settings for bounce and response
Adjust core CPU collision properties to set particle size, bounce, and sliding. These settings affect how realistic and customizable your VFX look when touching surfaces.
comparison
Collision Radius Source
- Choose between sprite bounds, mesh bounds (for mesh particles), or a custom size. Using sprite or mesh bounds makes collision size automatically track particle scaling.
Particle Radius Scale
- Increase to make collisions happen with a larger invisible sphere than the particle appears; decrease to allow closer proximity before colliding.
Restitution (Bounce)
- Set to 0 for no bounce (particles stop dead); set to 1 for fully reflective bounces. Typical values sit in between, like 0.6.
Restitution Blend
- Determines whether to use the particle's bounce, the surface material's bounce, or a blend of both. For example, "ignore" uses the particle's value only; "average" mixes them.
Random Collision Normal
- Introduce randomness so bounce directions don't look repetitive. 0.1 is subtle; 0.7 gives much wider variation.
Friction and Friction Blend
- Adjust friction to control how much a particle slides after contact. The blend can average or choose between the particle or surface's friction.
Rest Settings
- Advanced setups may use these, but for nearly all purposes, the defaults are appropriate. Skip unless you know you need them.

The Collision module properties panel is open in the Niagara editor, showing collision radius, restitution, and friction settings. — PrismaticaDev
Use CPU ray-traced collision when you need trace-based hits
CPU collision can trace each particle's movement through the world for fine control and precise events. Use this if you need interactions with moving objects or characters.
Choose CPU Ray-Traced Collision for Accurate Hits
- Select the desired Trace Channel for collision detection (like Visibility, World Static, or World Dynamic).
- Each particle will perform a line trace against this channel every frame.
- Adjust CPU Trace Vector Length Multiplier to define how far ahead each particle checks for impending collisions (smaller is faster).
- Max CPU Trace Length sets a hard limit for how far any particle checks.
- Analytical planes can be chosen for the lightest performance cost, but only allow two simple collision planes—best for basic setups.
- Expect higher performance costs for more particles or longer traces.

The Niagara editor shows the Fountain system with CPU ray-trace collision settings visible in the details panel. — PrismaticaDev
Choose GPU collision mode based on the scene
For larger particle counts, switch to GPU simulation. Set GPU collision mode depending on whether your effects need detail over visible geometry, in-depth world coverage, or just touch a few planes.
comparison
Depth Buffer Collision
- Use for very detailed, visible scene collision (such as interacting with static environment art or foliage). Highly accurate where surfaces are visible to the camera; follows visual mesh animation including world position offset.
Distance Field Collision
- Use for broad world coverage (such as interacting with far environments or large obstacles). Depends on meshes having distance fields enabled. Does not track mesh animation or work with characters.
Analytical Planes
- Suitable for extremely simple setups where only a finite number of flat planes are needed (two maximum).
Set the emitter's Sim Target to GPU Compute Sim and enable Fixed Bounds so particles are culled correctly when off-screen.

The Niagara editor shows a fountain emitter selected with Sim Target set to GPU Compute Sim and system bounds controls visible. — PrismaticaDev
Handle the limits of depth buffer and distance field collision

The Niagara editor shows the fountain system with Depth Buffer collision settings open on the right. — PrismaticaDev
Use translucent sprites for depth buffer collision
Opaque sprites with depth buffer collision can produce self-collision artifacts. Make sure to use translucent materials to avoid warnings and unexpected effects.
before after
Opaque Sprite Material (Wrong)
- Causes particles to collide with their own depth, often showing engine warnings or strange effects.
Translucent Sprite Material (Correct)
- Particles avoid self-collision issues and interact correctly with the scene using depth buffer data.
Also worth knowing
- Prefer CPU for Moving Targets: For accurate interaction with dynamic actors (like players or animated vehicles), CPU collision is more reliable than GPU modes.
- Depth Buffer Visibility: Depth buffer collision only works while particles are visible; they may disappear or pass through objects when occluded or moving toward the camera.
- Local Space for Attachments: When targeting moving objects (like shields), drive collision data from a parameter or keep the system in local space to sync with movement.
- Distance Field Requirements: A mesh must contribute distance fields for particles to interact; disabling this on the mesh disables those collisions.
- Project Settings Matter: If collision events don't trigger, check for missing collision settings in the project or emitter even if the static meshes already have collision.
- Self-Collision for Particle Meshes: Some particle mesh effects need extra logic to prevent particles from colliding with themselves, beyond the standard collision module.
FAQ
Unreal Engine 5 Niagara collision tutorial
Start by building a test system with basic CPU collision, then explore GPU collision modes like depth buffer and distance fields to see how each responds to your scene and particle behavior.
How to make collision effects in UE5
Create a Niagara system, add the Collision module in the emitter's Particle Update section, and customize bounce and friction for the desired impact and sliding effects.
UE5 particle collision guide
Use CPU ray-trace collision for precision on moving objects or characters, depth buffer collision for detailed visible surfaces, and distance fields for wide but coarse world interactions. Each has use cases and limits.
Niagara collisions Unreal Engine 5
Select your collision method based on whether the particles or targets are animated, static, visible, or hidden. CPU methods are more accurate for dynamic objects, while GPU methods scale for many particles and broad environments.
Beginner VFX collision tutorial UE5
Begin with a template like Fountain for a clear effect, then add and adjust collision in Particle Update before progressing to more complex setups, such as impact or environmental effects.
Official reference: Unreal Engine documentation.
Sources
Screenshots on this page are frames from the videos below, used to illustrate the steps they describe. All rights remain with their creators.
- Niagara Collisions | Niagara [UE5] — PrismaticaDev, September 11, 2023
Checked against: