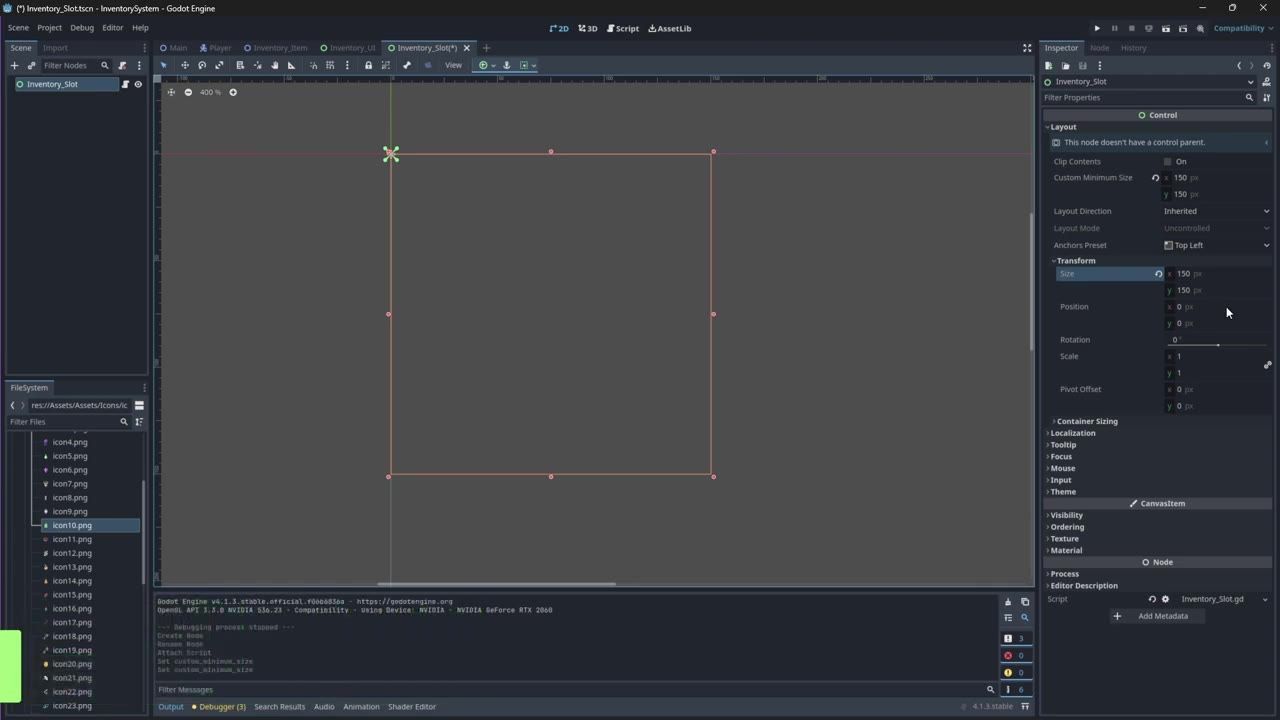
To build a functional slot-based inventory UI in Godot 4, start by creating a Control-based scene for a single slot, set its custom minimum size and anchors, add ColorRect nodes for the border, and place the item display and label inside. Use a transparent Button to handle pointer events, and add hidden details and usage panels to show when hovering or clicking. If your slot or its contents are not visible, check the Control node's size and transform settings before inspecting artwork or code.
Create the inventory slot scene
Begin your inventory UI by building one reusable slot as its own scene.

The Godot editor shows a scene tree with Control as the root node, a script open in the main panel, and the Inspector on the right. — Oops I Dev'd
steps
- Create a new scene with a Control node as its root.
- Rename the root node to
Inventory_Slotand save the scene in your scenes folder. - Attach a script to the slot scene and save it in the scripts folder.
- Set the root node's custom minimum size and size to 150 on both axes in the Inspector.
- Offset the slot root by setting its position to 10 on both X and Y axes. This will create the spacing between slots when assembled in a grid.
Build the slot frame with border nodes
Add the visual borders to define the slot frame, keeping content separate from the background.

The Godot editor shows a slot root with a selected ColorRect and the Inspector open. — Oops I Dev'd
steps
- Add a ColorRect node, name it
Outer border, and set its anchoring mode to full rect so it fills the slot. - Add another ColorRect node under the slot root, rename it to
Inner border, and set its size to 140 by 140. - Set the inner border's anchoring to center.
- Change the inner border's color to distinguish the item area from the outer border.
Add the item icon and quantity label
Place nodes to display the item image and stack quantity inside the slot.

Godot displays an inventory slot scene with a slot frame in the viewport and Sprite2D and Label nodes in the scene dock. — Oops I Dev'd
steps
- Under the inner border, add a Sprite2D node named
item icon. - Add a Label node named
item quantityunder the same parent. - Assign your desired item texture to the item icon and set its scale to 2.5.
- Center the icon by setting its position to 70 on X and Y.
- In the item quantity Label, set the text, change the font to Arcade Classic, set its size to 50, change the color to black, and move its X position to 85.
Add the item button for hover and click interaction
Let players interact with each slot by covering it with a transparent Button node.

The Godot editor shows the item button selected in the Scene dock with its properties open in the Inspector. — Oops I Dev'd
steps
- Add a Button node to the slot, naming it
item button. - Set the button's anchoring mode to full rect so it covers the entire slot area.
- In the button’s style override, assign a StyleBoxEmpty as the normal parameter to make it transparent.
- Connect the pressed, mouse entered, and mouse exited signals to your script for future logic.
Create the details panel and usage panel
Add the two hidden popups that will display item information or actions when the player hovers or clicks.

Godot displays an inventory slot scene with a white panel above the slot and a bottle icon inside the bordered slot. — Oops I Dev'd
steps
- Add a ColorRect node above the slot and name it
details panel. Set size to 240 by 130, and position it at Y = -135 (above the slot). Change its color to match your outer border. - Add three Label nodes to the details panel: one for item name (anchored top-left, X = 5, font Arcade Classic size 40, color #131313), one for item type (center-left, X = 5, slightly lighter color), and one for item effect (bottom-left, X = 5, even lighter color).
- Add another ColorRect node above the slot, name it
usage panel, set its color to match the outer border, size 240 by 130, and Y position -135. - On the usage panel, add two Button nodes:
use button(text: Use, size: 230 by 43, anchored center-top, Y = 10, font Arcade Classic size 40) anddrop button(text: Drop, size: 230 by 43, anchored center-bottom, Y = 71, font Arcade Classic size 40). - Set both panels' visibility to hidden by default; they will be shown by signals from the item button when the player interacts.
What to check when the slot UI does not appear right

The Godot Inspector shows the Control node for Inventory_Slot with custom minimum size and size fields visible. — Oops I Dev'd
Also worth knowing
- Set a custom minimum size: Set the slot root node’s custom minimum size to at least 150 by 150 to ensure all UI elements are visible and scale correctly.
FAQ
Godot 4 slot based inventory tutorial
Start by building a reusable Control-based slot scene, and add nodes for the frame, item icon, stack quantity, and interaction button inside it.
How to make an inventory UI in Godot 4
Create a new scene using a Control as the root, add ColorRect borders, an item display area, a quantity Label, and a transparent Button for interaction, with hidden panels for details and usage that show on pointer events.
Godot 4 UI anchors inventory system
Use anchored Control nodes for both the slot borders and internal labels, so that elements stay correctly positioned and sized as the inventory scales or moves.
Beginner inventory system Godot 4
Focus on creating a compact, modular slot scene that can be reused before wiring item logic, so your system is easy to adjust as you add more features.
Godot 4 drag and drop inventory tutorial
This slot setup forms the base for adding drag-and-drop logic, since the Button and popups handle the core interaction and are ready for signals to manage item movement later.
Official reference: Godot documentation.
Sources
Screenshots on this page are frames from the videos below, used to illustrate the steps they describe. All rights remain with their creators.
- Let's Make a Dynamic Slot-Based Inventory System in Godot 4 | Part 7 - Inventory Slot #1 — Oops I Dev'd, December 20, 2023
Checked against:
- Godot Engine - Blog – Godot Engine — Godot Engine